

Photo Credit
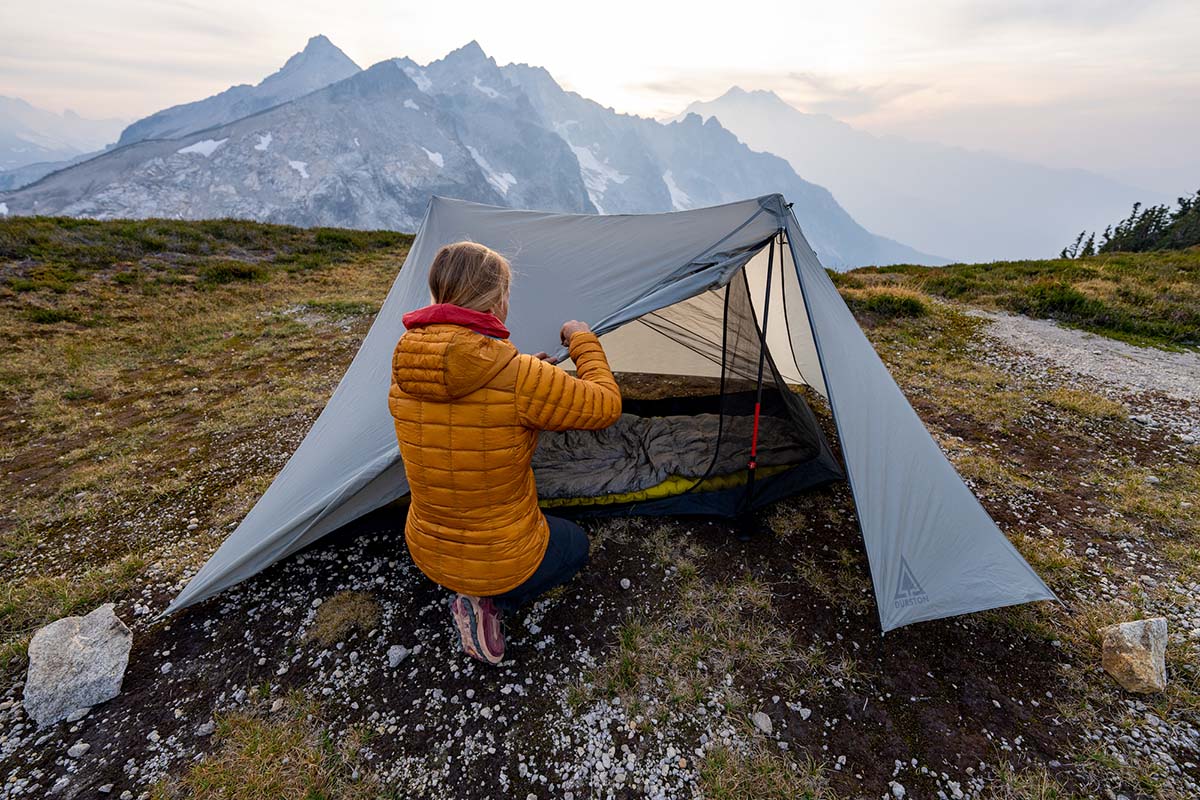
When choosing the right backpacking tent, you have a wide range of options, from minimalist ultralight shelters to inexpensive, heavier entry-level models. Uses and budgets vary, but after extensive testing and many nights sleeping under the stars, we selected 10 standout tents for everyone from first-timers to seasoned veterans, with the Big Agnes Copper Spur UL2 coming out on top. For ease of comparison, we’ve primarily listed two-person models here with other available capacities listed in the specs. For more background information, see our comparison table, buying advice, and details about our testing process.
Editor's note: We updated this guide on January 21, 2026, to remove several models, add the Big Agnes Blacktail 2, and add photos from recent testing trips. We also added a tested and dismissed section and combed through the guide to ensure all information—including prices, colors, and specs—was up to date at the time of publication.
 Category: All-around
Packaged weight: 3 lb.
Floor dimensions: 88 x 52/42 in.
Capacities: 1P, 2P, 2+P, 3P, 3+P, 4P, 5P
What we like: Best-in-class combination of low weight, generous interior space, and ease of setup.
What we don’t: Pricey and thin materials require extra care.
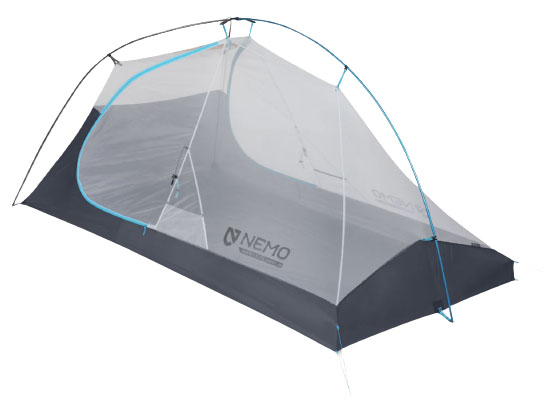
For a backpacking tent that deftly balances weight, interior space, and features, look no further than the Big Agnes Copper Spur. This tent helped define the ultralight category and is still going strong many renditions later. In the latest two-person version, you get a healthy 29 square feet of floor space, solid headroom with pre-bent poles and steep walls, and two doors and vestibules—all at just 3 pounds. It’s much lighter than competitors, but it comes with a few compromises. We’ve tested various iterations of the Copper Spur everywhere from Patagonia to Mongolia, and even East Africa, and it’s performed flawlessly in conditions ranging from warm nights to heavy rain and wind.
The Copper Spur UL2 is one of the pricier tents in its class, and you’ll want to be careful with the delicate materials (the 15 x 20D floor, in particular, is thin and won’t hold up to wear and tear as well as heavier models). In addition, while the low weight is worth it for those who get out a lot, recreational backpackers may be better off with a heavier yet more durable design. Nevertheless, the Copper Spur’s quality is impeccable, with substantial zippers, thoughtful interior storage, color-coded grommets, and easy adjustments to dial in your setup.
See the Big Agnes Copper Spur UL2

 Category: All-around
Packaged weight: 3 lb. 6 oz.
Floor dimensions: 88 x 52 in.
Capacities: 1P, 2P, 3P
What we like: Highly livable and well-built, with a recent ventilation upgrade.
What we don’t: Heavier and less weather-worthy than the past model.
The MSR Hubba Hubba is an absolute staple in the backpacking community. And while we do think the Copper Spur is better, we've been testing the latest Hubba with great results. The latest design, the Hubba Hubba LT, retains much of what we loved about the prior version, including a non-tapered floor plan that is both longer (by 4 in.) and wider (by 2 in.), a 40-inch peak height, and near-vertical walls that offer excellent interior space. Weight-wise, the LT is 2 ounces heavier than the past-generation model, but it’s still competitive with the likes of the Big Agnes Copper Spur (3 lb. 2 oz.). Quality remains a hallmark of the design, including easy-to-trust DAC poles, functional interior storage, and thin (20D) but reliable fabrics. As long-time fans of the Hubba Hubba, we've been eagerly testing the LT since its release—from chilly winter backpacking trips in Appalachia to using it as a basecamp shelter for long multipitch missions—and so far are impressed.
One area we’re concerned about with the latest Hubba Hubba LT, however, is weather resistance. While the past model was an above-average performer in this category, the LT uses significantly more mesh in the design, which is great for airflow but detracts from wind protection (and warmth if you get out well into the shoulder seasons). Its rainfly also leaves more of the tent body exposed at the base, although the bathtub floor is high enough to bridge the gap. These concessions would be fine if the weight dropped... but it actually went up a smidge. So far, we haven't had any issues, but we haven't weathered a heinous storm with it yet. All told, while we have a few gripes, we are still huge fans of this classic silhouette and don't hesitate to bring it into the backcountry.
Read more: MSR Hubba Hubba review
See the MSR Hubba Hubba LT 2P
 Category: All-around/budget
Packaged weight: 5 lb. 8 oz.
Floor dimensions: 90 x 52 in.
Capacities: 2P, 2+P, 3P, 3+P, 4P
What we like: A versatile budget design from one of the best tent makers in the business.
What we don’t: Not the cheapest backpacking tent you can find; heavy and bulky.
Big Agnes consistently delivers when it comes to lightweight backpacking tents, blending solid construction with thoughtful weight savings, and the Blacktail is their strongest value-oriented option. The design emphasizes comfort, with a spacious floor plan and excellent headroom courtesy of pre-bent poles and a ridge pole at the peak. Ventilation is well executed, thanks to extensive mesh throughout the body and dual vents in the rainfly, and two doors with matching vestibules make entry, exit, and gear storage straightforward. We also appreciate that the Blacktail doesn’t skimp on premium touches, borrowing details from Big Agnes’ higher-end tents, such as the Quick Stash door keeper, media pockets with cord ports, and pre-cut guylines.
That said, “budget” is relative here: the Blacktail costs more than bare-bones options from Coleman or Kelty. Even so, we think the extra investment is justified by the Blacktail’s stronger weather protection, comfort, and overall refinement. This tent offers a stellar balance of price to performance. We’re still holding out hope for a less expensive standout to reclaim this category (REI’s Trail Hut 2 long filled that role, but is sadly unavailable). Weight is another consideration—the Blacktail is heavy and bulky, making it best suited for sharing between two hikers. But after nights spent in lighter, flimsier shelters, we consistently looked forward to retreating into the Blacktail’s roomy and reassuring interior at the end of the day. For a broader selection of our favorite value tents, check out our dedicated round-up of the best budget backpacking tents.
See the Big Agnes Blacktail 2

 Category: Ultralight
Packaged weight: 2 lb. 1 oz.
Floor dimensions: 85 x 50/42 in.
Capacities: 1P, 2P
What we like: Incredibly lightweight without sacrificing the two-door, two-vestibule design.
What we don’t: Thin fabric requires extra care; the floor plan is very tight for two.
Ultralight tents can get specialized, with some high-end, trekking-pole-supported shelters dipping as low as 1.2 pounds. But for those coming from a traditional backpacking background, we prefer an option like Nemo’s Hornet Elite Osmo 2P. While not the lightest tent at 2 pounds 1 ounce all in, it’s an approachable option. The Hornet Elite is easy to set up with an intuitive semi-freestanding design and color-coded components, well built with quality materials that—while thin—have held up well throughout testing, and more reliable in bad weather than many competitors. Ounce for ounce, the Hornet Elite is one of the most livable and premium options in its weight class, making it a great choice for everyone from serious thru-hikers to those just dipping their toes in the UL space.
While the Hornet Elite is arguably the best semi-freestanding ultralight tent, its construction has a host of limitations. Nemo doesn’t list a thickness for the fabric, but after chatting with them about their unique Osmo Fabric, they said it's around 10 denier for the fly and floor, which is thin. Further, while Nemo managed to retain a two-door-and-vestibule layout, the Hornet Elite’s tapered and streamlined floor plan is a very snug place for two. But if you choose your campsites wisely (don’t pitch the Hornet Elite on top of sharp rocks or sticks) and aren’t opposed to cozying up with your tentmate, the Nemo is a remarkable 2-pound shelter. If you're interested in reading about more specialized ultralight tents, check out our guide to the best ultralight tents.
Read more: Nemo Hornet Elite Osmo 2P review
See the Nemo Hornet Elite Osmo 2P
.jpg)
 Category: All-season
Packaged weight: 4 lb. 1 oz.
Floor dimensions: 84 x 50 in.
Capacities: 1P, 2P, 3P
What we like: Lightweight yet much burlier than a standard 3-season tent.
What we don’t: Expensive; solid walls impact breathability in mild conditions.
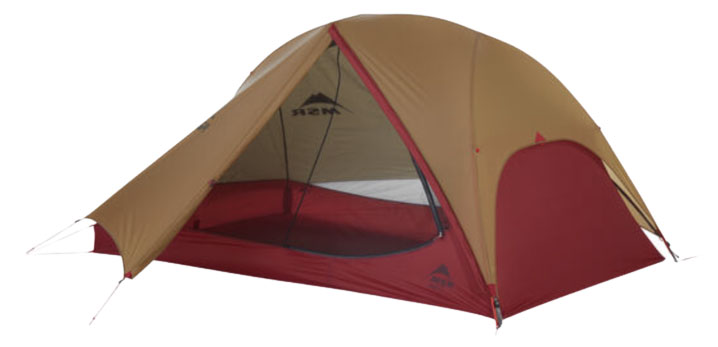
The majority of backpacking tents are lightweight 3-season models, but if you anticipate getting out in tougher conditions, you may want to step up your protection. Slotting just below a full-on winter-ready design is MSR’s Access 2. With a sturdy structure, durable poles, and less mesh than its warmer-weather counterparts, the Access is built to handle driving wind, rain, and snow. Importantly, you still get two doors, vestibules, and a decently roomy, non-tapered floor area for just 4 pounds 1 ounce, which is impressive. For backcountry ski trips or spring mountaineering, when you need a step up from a standard backpacking tent, the Access is well worth a closer look. We've also heard tales of thru-hikers picking up an Access for early-season thrus, or when they know they'll be hitting some heinous snowy weather along the long-trail mountain ranges.
Our biggest gripe with the Access is that it’s not versatile for mild conditions—with very little mesh in the tent body, it’ll overheat quickly unless you’re mindful to keep doors and vents open at night. And it’s spendy. In terms of other tents that fit a similar designation, the Hilleberg Nallo is a tough option (compare its 70D floor to the MSR’s 30D) but offers less interior space, is less breathable due to its thicker materials, and is heavier than the Access at 5 pounds 5 ounces. The Access strikes a nice balance of weight, price, and performance.
Read more: MSR Access 2 review
See the MSR Access 2
.jpeg)

Category: Ultralight
Packaged weight: 1 lb. 3.5 oz. (Blue w/ Lite Floor)
Floor dimensions: 84 x 50 in.
Capacities: 2P, 3P
What we like: Extraordinarily light yet roomy and durable; Dyneema doesn't sag and won't ever lose its waterproof properties.
What we don’t: Mesh-heavy design is vulnerable to high winds.
A number of leading ultralight tents use Dyneema Composite—the high-tech fabric praised for its hydrophobic nature, sag resistance, and stellar strength-to-weight ratio. The trekking-pole-supported Zpacks Duplex Pro Tent (formerly the Duplex Zip) is a classic and time-tested design. With an incredibly low weight of just 1 pound 3.5 ounces (excluding stakes, in the Blue w/ Lite Floor iteration), it’s by far the lightest tent here but offers a roomy sleeping area for two and includes a bathtub floor for a true tent-like feel. In use, we found the Zpacks to be user-friendly and weather-protective, roughly on par with ultralight semi-freestanding tents that check in a full pound heavier. And the latest “Pro” version builds off the original Duplex, with modernized features like zippered storm doors, peak vents, and magnetic doorkeepers. In the end, no tent is perfect, but the Duplex Pro feels complete for a design this feathery.
Within this category, we’d be remiss not to also mention the Hyperlite Unbound 2, which is similar to the Zpacks but has a more premium look and feel. However, the Unbound is heavier, uses a thinner floor fabric, and lacks the Duplex’s end cinches that close the mesh gap between the canopy and bathtub floor, which can make a difference in high winds or heavy rain. In the end, we like the durability and low weight of the Duplex Pro.
See the Zpacks Duplex Pro
 Category: Ultralight
Packaged weight: 2 lb. 15 oz.
Floor dimensions: 88 x 66/60 in.
Capacities: 1P, 2P, 3P
What we like: Lightweight yet still roomy.
What we don’t: Semi-freestanding design is more difficult to pitch.
If you’re traveling as a pair, a two-person tent is your best bet for streamlining weight and bulk. But if you’ve ever been tent-bound in a storm before, you know: The walls can start closing in quickly. The good news is that with advancements in fabric technology and tent design, it’s possible to bump up to a more spacious shelter without dramatically increasing your load. Big Agnes’ Tiger Wall UL3 is one of our favorite three-person tents thanks to its low weight—for right at 3 pounds, it’s a very roomy shelter for two, with space still left over for a child, a canine, or gear. If you’re traveling in inclement weather, with a smaller third companion, or just like the idea of some extra room (without a crazy weight penalty), it’s as good an option as any.
The Tiger Wall keeps weight down with a semi-freestanding design, but it comes with some disadvantages. We’ve found it difficult to get a taut pitch when camping on rock, and the tent isn’t as weather-worthy as a freestanding design like the Copper Spur. But you do get two doors and two vestibules, and a large ridge pole across the center offers a great boost in headroom. In terms of materials, the Tiger Wall’s silicone-coated nylon is strong (though still thin and requires gentle treatment), and we like that Big Agnes has turned to fade-resistant solution-dyed fabrics to reduce its environmental footprint.
Read more: Big Agnes Tiger Wall UL2 review (bikepack version)
See the Big Agnes Tiger Wall UL3
 Category: All-around
Packaged weight: 3 lb. 11 oz.
Floor dimensions: 84 x 53/43 in.
Capacities: 2P, 3P
What we like: Tension Ridge maximizes livable space and ventilation.
What we don’t: Water can pool in the fly’s concavities and drip in through the vents.
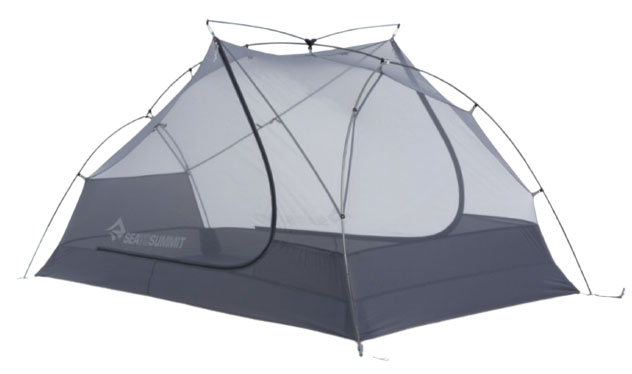
Australia-based Sea to Summit is a reliable go-to for outdoor gear, but 2021 marked their first foray into backpacking tents. And they entered the competitive market with a bang, unveiling two models: the semi-freestanding Alto TR and the all-around Telos TR featured here (a more budget-friendly Ikos TR was also released). The headliner is the unique Tension Ridge, which gently bends the ridge pole upward at each end rather than the more common downward-sloping design (concave vs. convex). It’s a small construction tweak with a significant effect, resulting in taller doors, increased livable space, and better airflow (the vent naturally stays agape at the apex rather than drooping closed). Tack on a number of creative extras—including a snap-on “Lightbar” headlamp diffuser and a versatile fly that sets up in multiple configurations—and it’s safe to say that Sea to Summit made one heckuva debut.
The Telos TR2 takes direct aim at the Copper Spur UL2: Both are freestanding tents that feature thin fabrics, tapered footprints, and two doors and vestibules. The Copper Spur costs more but edges out the competition in weight and floor dimensions, with a half-pound lighter build and 3.5 inches of extra length. That said, it’s a close call in terms of livability: The Telos’ generous 43.5-inch peak height and ridge-pole design make for a very spacious interior (the Big Agnes’ peak height is 40 in.). But we should note that the Sea to Summit has a flaw in wet weather: During our testing in a torrential downpour, rain pooled in the concavities of the fly and slowly dripped into the tent through the vent opening. But even with that issue in mind, we still like the direction the Telos is headed.
Read more: Sea to Summit Telos TR 2 review
See the Sea to Summit Telos TR 2
 Category: All-season
Packaged weight: 5 lb. 5 oz.
Floor dimensions: 86 x 43 in.
Capacities: 2P, 3P, 4P
What we like: An absolute tank in high winds.
What we don’t: Expensive and overkill for mild conditions.
For hitting the backcountry in winter or even treks in inhospitable places like Nepal or Peru, you’ll most likely want a step up in toughness and warmth from the 3-season tents that dominate this list. Enter Hilleberg’s fantastic Nallo (Hilleberg describes it as “all-season” and they don’t use that designation lightly). With a tunnel-like shape rather than a traditional dome layout, the Nallo excels in strong gusts and heavy precipitation. Just face either end of the tent in the direction of the wind, batten down the hatches with the many guylines, and sleep in relative peace. We used the Nallo in some brutal weather above the Arctic Circle and were impressed by its toughness.
The Achilles' heel of the Nallo is breathability. If you’re backpacking in warm conditions, it struggles to ventilate, and condensation can build up on the inner walls. Other downsides of the Nallo include the steep price and hefty build, which is over a pound heavier than the MSR Access. What's more, the Hilleberg features just one door and vestibule. In the end, there’s no denying that Hilleberg tents are expensive, but their stalwart weather protection makes them top choices for guides, avid explorers, and backpackers headed into inclement conditions.
See the Hilleberg Nallo 2
 Category: Semi-freestanding tent
Packaged weight: 2 lb. 5 oz.
Floor dimensions: 84 x 50 in.
Capacities: 1P, 2P, 3P
What we like: The non-tapered footprint offers more versatility for sleeping arrangements.
What we don’t: Truncated fly; not as much headroom as the Tiger Wall.
MSR’s FreeLite 2 goes head-to-head with top ultralight models like the Nemo Hornet Elite and Big Agnes Tiger Wall, boasting a similar two-door, two-vestibule layout that’s far more convenient for two backpackers than one-door options. One standout feature is the FreeLite’s non-tapered floor, which offers more usable space for side-by-side sleeping (or head-to-toe, if that’s your thing) and helps avoid that cramped, coffin-like feel. To shave weight, MSR used a shortened rainfly at the head end but swapped out the underlying mesh for water-resistant fabric to add protection. We did find this wets out faster than a rainfly that extends all the way to the ground, though. We recently put the FreeLite 1 through the wringer on a rugged trek across the highlands of Kenya, East Africa, where it held up admirably in high winds and tropical storms—and even held its ground against curious elephants in the night (who kept their distance). That said, prolonged rain did eventually make its way in through the shortened fly.
So with a lighter weight and more spacious floor than the Tiger Wall UL2, why doesn’t the FreeLite 2 rank higher? It mostly comes down to interior livability: the Tiger Wall offers a few extra inches of headroom and a longer ridge pole that stretches the walls outward, creating more usable space for sitting up and changing. And while we appreciate the FreeLite’s more wind-resistant body with less mesh, the benefits are partially negated by its shortened rainfly, which left us vulnerable during prolonged storms. Both tents are top-tier in quality, but for most backpackers, the Tiger Wall is the more comfortable and weather-ready choice.
Read more: MSR FreeLite 2 review
See the MSR FreeLite 2
We’ve put a number of other high-quality designs through their paces, but they ultimately didn’t make the final cut. Our aim is to spotlight true standouts—tents that excel in value, protection, and long-term durability. Every model we recommend has been tested across multiple seasons, ensuring it can be trusted in real-world conditions.
We decided to remove the Nemo Aurora tent this round. While it's a fantastic design at an affordable price, we feel the weight and overall bulk make it better suited for car and frontcountry camping. We also don't feel it offers anything the other Nemo tents don't, specifically for backpacking.
The sleek and lightweight SlingFin Portal 2 is another tent we decided to remove. While we love the unique and noteworthy features, the all-mesh body is vulnerable to the elements and not as weather-resistant as we hoped. It's a great lightweight design, but it's too niche for this round-up, and didn't perform as well as we thought it might in real-world tests.
The polarizing Big Agnes Fly Creek UL2 is also one that we decided to remove this round. While it's one of the more impressive freestanding UL tents due to its 2-pound 4-ounce weight, its design is not for everyone, and it is much better suited for our dedicated ultralight backpacking tents round-up.

| Tent | Price | Category | Weight* | Floor Dimensions | Floor Denier | Capacities |
|---|---|---|---|---|---|---|
| Big Agnes Copper Spur | $600 | All-around | 3 lb. | 88 x 52/42 in. | 15Dx20D | 1, 2, 2+, 3, 3+, 4, 5P |
| MSR Hubba Hubba LT 2P | $550 | All-around | 3 lb. 6 oz. | 88 x 52 in. | 20D | 1, 2, 3P |
| Big Agnes Blacktail 2 | $300 | Budget | 5 lb. 8 oz. | 90 x 52 in. | 75D | 2P, 2+P, 3P, 3+P, 4P |
| Nemo Hornet Elite Osmo 2P | $700 | All-around | 2 lb. 1 oz. | 85 x 50/42 in. | Unavail. | 1, 2P |
| MSR Access 2 | $800 | All-season | 4 lb. 1 oz. | 84 x 50 in. | 30D | 1, 2, 3P |
| Zpacks Duplex Pro | $799 | Ultralight | 1 lb. 3.5 oz. | 84 x 50 in. | 0.75 oz/sqyd | 2, 3P |
| Big Agnes Tiger Wall UL3 | $580 | Ultralight | 2 lb. 15 oz. | 86 x 66/60 in. | 15D | 1, 2, 3P |
| Sea to Summit Telos TR 2 | $449 | All-around | 3 lb. 11 oz. | 84 x 53/43 in. | 20D | 2, 3P |
| Hilleberg Nallo 2 | $1,030 | All-season | 5 lb. 5. oz. | 86 x 43 in. | 70D | 2, 3, 4P |
| MSR FreeLite 2 | $500 | Ultralight | 2 lb. 5 oz. | 84 x 50 in. | 15D | 1, 2, 3P |
*Editor's note: "Weight" refers to the packaged weight of each tent, with the exception of trekking pole-supported models.
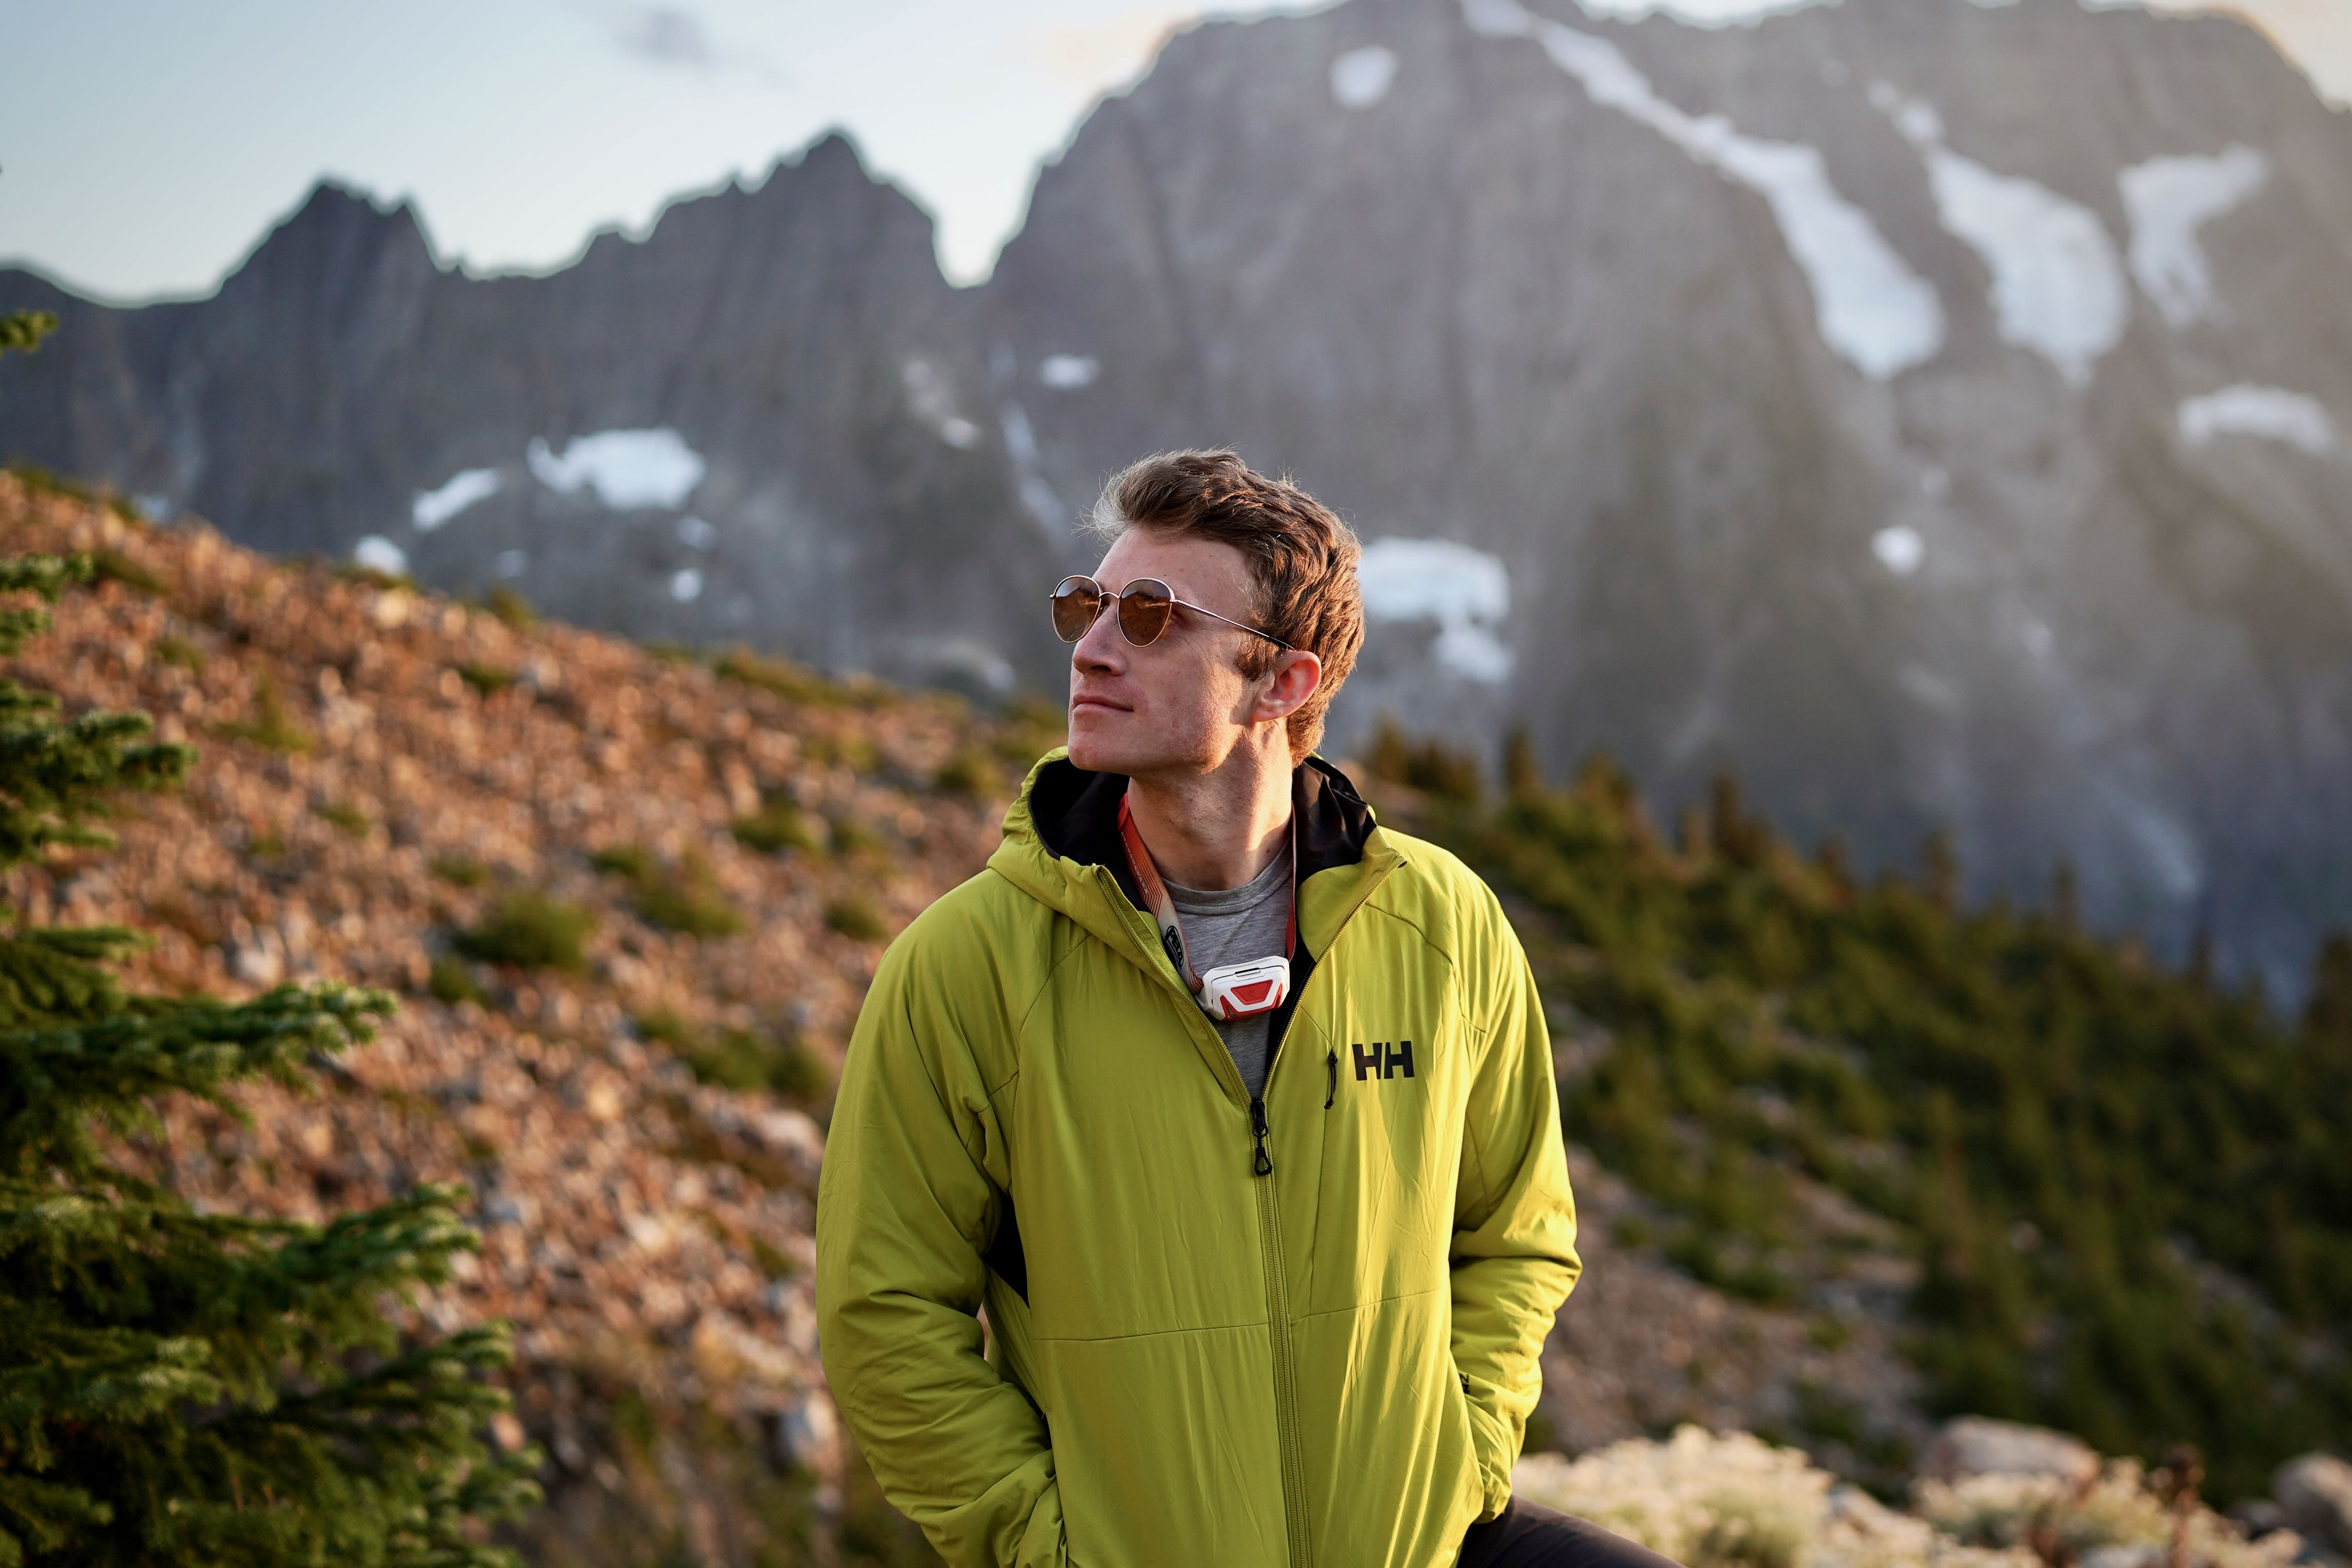
From lofty peaks in the Cascades to the hot, dusty African savannah, the Switchback Travel team has pitched hundreds of different tents in just about every environment and climate imaginable. We know the importance of a lightweight yet stalwart shelter for comfort, safety, and efficiency in the backcountry, and we set a high bar for tents that earn a spot in our packs. This round-up was curated with an initial collection of eight tents back in 2015. Senior editor Chris Carter took over this guide in 2024. A lifelong backpacker and alumnus of all three of the Triple Crown trails in the United States (AT, PCT, and CDT), Chris has spent more time under a flimsy sheet of silnylon than under a real roof.
We consider several key factors before giving tents any real estate in this guide. Livability is an obvious place to start, and we look for designs that effectively balance roominess with weight and durability (there's always a trade-off). Weather protection and ventilation are also top considerations, along with vestibule space, interior storage, and ease of setup. Every model we chose had to stand out across multiple categories and prove itself in grueling real-world tests to land a spot on our list. Rest assured, we will continue researching and testing the latest and greatest options and updating this guide accordingly. If you want to dig into more details before making a decision, be sure to also check out our article on how to choose a backpacking tent.
.jpg)
There are as many styles of backpacking tents as there are backpackers, from streamlined, thru-hiking-inspired designs to durable and comfortable classics. It follows that when deciding on a tent, you’ll first want to think about what backpacking looks like for you. Are you someone who gets out every weekend of the summer, or just a few days a year? Do you like to travel fast and light or prioritize comfort and durability? How much space do you need? We'll break the field down into four separate categories: all-around, budget, ultralight, and all-season.
.jpg)
All-Around
Backpacking tents in our all-around category are the core of the market. These tents offer the best combination of livability and weight savings, weighing around 3 to 4 pounds (for a 2P model) and featuring complex pole structures that yield steep walls and generous interior space. Their design also translates to impressive stability in high winds and great wet-weather protection. Further, almost all-around tents feature two doors and two vestibules, which adds a great deal of convenience and storage. But there are a few caveats: These tents are expensive and have thin fabrics and zippers. Finally, although all-around tents are doable for two sleepers, you’ll often find larger floor plans in our budget category. But for class-leading performance, tents in our all-around category are our top choice for most.

Budget
If you’re new to backpacking or only get out a few times a year, it’s worth taking a look at a budget tent. Most of these designs have an MSRP of less than $350 and are defined by their thicker fabrics, simple pole structures, and heavier builds. Comfort is high, with spacious floor plans that don't compromise on weight savings, two doors and two vestibules, and lots of storage. And with considerably more durable fabrics, they can withstand much more use and abuse, which is good news for those who don’t want to spend too much time caring for their gear. It's true that budget tents lack the fancy architecture and low weight of more expensive tents here, but in our opinion, they're all beginners need and nothing more. The Big Agnes Blacktail 2 is our favorite budget tent.

Ultralight
Weight-conscious thru-hikers have relied on bare-bones shelters for a long time, but only recently has the ultralight craze hit mainstream backpacking. The number one consideration here is keeping weight to a minimum (3 pounds or less), which ultralight tents achieve through thin fabrics and zippers, tapered floor areas, heavily sloped ceilings, fewer doors, smaller vestibules, and simplified pole structures. Further, the majority are non-freestanding or semi-freestanding, meaning they must be staked out to hold their shape, often using trekking poles as tent poles. Unsurprisingly, there is a fair share of potential trade-offs with tents in this category: they offer less weather protection, require a lot of extra care, and can be cramped quarters for two. Further, you'll spend up to drop weight: Most ultralight tents are $400 or more, and Dyneema tents like the 1-pound 3.5-ounce Zpacks Duplex Pro will run you even several hundred more.

But we’re big believers that ultralight gear can be taken too far, which is what happens (in our opinion) when tent floor fabrics drop below 15 denier (as is the case with the Big Agnes Tiger Wall Platinum’s 7D floor) or when you wake up with a tent wall stuck to your face (a real life experience we had with the Six Moon Designs’ Lunar Solo). We understand the appeal for thru-hikers and serious backpackers, and in the right environments, the compromises can be minimal. But for most recreational backpackers, the weight savings probably aren’t worth it. Most of the time, you can get a whole lot of comfort and convenience by buying a tent that’s just one pound heavier. For this reason, we feature a few ultralight tents here and are sure to call out their weaknesses in the write-ups. For a deeper dive on this topic, see our article: Backpacking Tents: How Light is Too Light?
All-Season
We’ve included a few all-season tents on this list to provide a complete view of the backpacking market, including the MSR Access and Hilleberg Nallo. These tents offer more protection than your standard 3-season tent without being as bulky or expensive as a 4-season tent. Whereas most 3-season designs are mesh-heavy, all-season tents use mostly nylon walls for better warmth and wind protection. You also get sturdier pole structures, which adds weight but is worth it when the weather turns. You can expect higher price tags and increased weights in this category, but all-season tents are nevertheless our top pick for backpacking in areas like Peru, Nepal, or Alaska. And if weight isn't your top priority, you can always bump up to a three-person version for more space.
.jpg)
A backpacking tent is one of the heaviest and bulkiest items you’ll pack for an overnight trip, but the good news is that modern designs are lighter than ever. The two-person tents on our list range from 1 pound 3.5 ounces for the non-freestanding Zpacks Duplex Pro to 3 pounds for popular models like the MSR Hubba Hubba LT and Big Agnes Copper Spur UL2. In general, you can expect budget tents to be the heaviest, followed by all-season, all-around, and ultralight. As with most outdoor gear, shaving weight from a tent design comes with trade-offs, often at the expense of durability, interior space, weather protection, or ventilation. In the end, it helps to be mindful of your priorities when choosing a tent.
.jpg)
Packaged Weight vs. Trail Weight
When researching tent weight, you’ll commonly see manufacturers and retailers list two specs: packaged weight and trail weight (also called "minimum weight"). Packaged weight includes everything that comes with the purchase of the tent, including the tent body, rainfly, poles, stakes, guylines, stuff sacks, and footprint. This is an important factor to consider when comparing models, as a footprint can tack on 7 ounces or more to the total tent weight, not to mention a stuff sack that may be unnecessary while backpacking.
.jpg)
The trail weight, on the other hand, only includes the tent body, rainfly, and poles. We’ve chosen to list packaged weight in the specs above—it’s closer to what most folks realistically bring—but keep in mind that you can trim ounces from there. Depending on the build of the tent components, the difference between packaged weight and minimum weight can be substantial.
Floor Dimensions
In parsing out how roomy a backpacking tent is, the first thing you’ll want to evaluate is the floor dimensions (L x W), which matter when you’re trying to fit two backpackers with their sleeping pads side-by-side. In general, the floor area of a tent tends to decrease as weight decreases, and some two-person tents can get cozy with two adults and gear inside. You can always size up to a “plus” or three-person version for more space. It’s also worth noting that some tents taper at the foot end, which helps shave weight but also negatively impacts livability, making it hard to sleep head-to-toe. In these cases, we’ve provided two measurements for the floor width (86 x 52/42, for example). And a final note on floor dimensions: While they’re a good place to start, they don’t tell the whole story about a tent’s interior space. Take the tent’s peak height and shape into consideration, as well as the slope of the walls.

Peak Height and Slope
A tent’s “peak height” refers to its tallest point, and among two-person models varies from 39 inches for a design like the Big Agnes Tiger Wall UL2 up to 48 inches for the Zpacks Duplex Pro. But while peak height does make a difference in terms of sitting up and moving around inside your tent, it’s important to also consider the slope of the walls in order to get a true picture of a tent’s livability. To understand this, just picture the difference between a pyramid-shaped tent (a tall peak height at the apex with sharply sloped walls) and a box-shaped tent, which features the same peak height throughout (headroom is the same at the sides as in the middle). Slope is a trickier subject than peak height and cannot be communicated via a simple measurement, but there are a few telltale signs to look for.
Most of today’s premium designs feature pre-bent poles and a ridge pole, both of which help to stretch the walls outward and make them near-vertical. This can go a long way toward extending the peak height, both lengthwise and widthwise. Some budget and ultralight tents use simplified pole structures (or even trekking-pole setups), resulting in a sharper slope and less interior space. The tents with a higher peak height and extended walls can be cozy for chatting, and the difference can make the cheaper tents feel like sitting in a coffin. Not everyone will need to prioritize a tent with a generous peak height throughout, but it’s worth it for those who anticipate bad weather or plan to spend a lot of time inside.
.jpg)
One of the easiest ways to think about tent durability is to consider the fabric thickness, measured in denier. The higher the denier of the floor, canopy, and rainfly, the more durable the tent. Logically, the denier lines up with the weight. Ultralight gear requires an extra level of care—we typically recommend using a footprint with lightweight tents and checking your campsite for sharp sticks or rocks—but it’s a sacrifice many are willing to accept to reduce their packed weight. Because the area most vulnerable to punctures or tears is the floor, we list this number in the specs and comparison table.
.jpg)
While fabric thickness is a large factor in determining a tent’s durability, it’s not the only one. The quality of the rest of the materials (poles, zippers, etc.) also plays a part, as does the attention to detail. Additionally, premium tents often add a silicone coating (also called “silnylon”) to their thin fabrics to improve tear strength and longevity, while most budget designs do not. This is an expensive process—there’s a reason Hilleberg tents are $850 or more—but the payoff is incredible toughness even on a tent like the Nallo that uses otherwise thin 30-denier fabric. We’ve learned to trust the quality of tents from leading manufacturers like REI, Nemo, and MSR, but you’ll want to be more careful with dedicated budget brands, such as Alps Mountaineering, which specialize in entry-level tents.
.jpg)
Your first line of defense in bad weather is the rainfly. As the name suggests, the rainfly covers the exposed tent body to increase resistance to precipitation, wind, and cold. Even ultralight designs have a waterproof coating, are seam-taped, and can withstand hours of downpour without leaking, provided they cover the entire tent body (we’ve found that most leakage actually comes from the ground around the bottom of the tent). We almost always recommend a full-coverage rainfly, though some tents, like the Nemo Hornet Elite, have impressive weather resistance even with some sections protected only by the tent body.
.jpg)
The next factor in weather resistance is the tent structure. In general, more expensive tents offer increased weather resistance (some ultralight models are exceptions). The poles and pole systems on budget tents are likely to bow during strong winds, while high-end tents like those from MSR and Big Agnes have stronger poles and tons of exterior ties to anchor yourself down during a storm.
A healthy percentage of people get up to the mountains a few weekends a year during the summer months and encounter moderate conditions in terms of temperature, wind, and precipitation. If you fall into this category, all of our list should perform admirably. That being said, subsequent trips in a Hilleberg did make us appreciate the quality and bombproof feeling you get in a high-end tent.

How well a tent ventilates depends on a couple of factors. First, look at the amount of mesh on the tent itself. A double-wall tent (with the tent body and rainfly as separate pieces) with ample mesh should breathe well in mild weather. Leave the rainfly off, and the tent will be even more comfortable in hot temperatures, so long as the sun isn't hitting you directly. With the rainfly on, things get trickier. A standard rainfly has a waterproof coating to help protect the interior from getting wet, which also means the rainfly doesn’t ventilate very well, and moisture from your breath is trapped inside, creating a dewy interior.
.jpg)
So what can you do? Tent manufacturers combat these problems by installing roof vents at the top of the rainfly, which can be deployed even in the rain. The vents are covered at the top with the rainfly fabric, so only in a strong storm with rain coming in sideways will raindrops reach the interior. By creating good airflow out the top of the tent and good spacing between the rainfly and tent body at the bottom, moisture collecting on the interior of the tent can be greatly reduced. And some tents, like the Sea to Summit Telos TR 2, have convertible-like rainfly designs that roll back easily. You can leave half of the rainfly open for ventilation and stargazing, but if you feel a couple of raindrops during the night, it only takes a few seconds to roll the rainfly back down.
.jpg)
Tent storage can be broken into two categories: vestibules and gear closets outside the tent, and pockets inside the tent body for small items you need close at hand. A traditional vestibule covers the tent's entry door, providing enough space for a couple of backpacking packs and footwear. Without it, your options are to bring the wet, grimy gear inside the tent or let it soak outside. Needless to say, we put a priority on some sort of outside gear storage. The amount of vestibule space is measured in square feet and can vary significantly. Among our top picks, the smallest vestibules have just one door.
.jpg)
A tent with excellent interior organization isn’t a top priority; that is, until you get into the tent for the first time and look for a spot to store your headlamp, handheld GPS, or other small items. We’ve found the most helpful area for a pocket is near your head, and a simple mesh drop-in pocket or two is sufficient. Some tents have pockets along the interior of the roof, which make it easy to squeeze in a headlamp to light up a game of cards. Should the tent not include pockets along the roof, look for hang loops instead for securing a light. These extra little details can make your backcountry camping experience all the more enjoyable.
.jpg)
This article covers primarily two-person backpacking tents (the most common capacity), and a quick look at our picks shows our clear preference for models with two doors. These designs are by far the most convenient if you consistently camp with a partner: Each person has their own door for getting in and out, including vestibule storage space. A few models use just one door to save weight. If you’re sharing the tent with a partner, this can be a major downside—you’ll be crawling over your tent mate to get in and out, and will be limited to one vestibule for exterior storage. In the end, unless you’re traveling alone or pulling out all the stops to save weight, we recommend a tent with two doors.
.jpg)
The good news for backpackers is that setting up a modern tent has become easy. Many of us remember the fabric sleeves of old, which were both time-consuming and frustrating, but most tents now use simple clips that take only a matter of seconds to attach. In addition, tent poles have become streamlined and come together with ease. To set up most tents, lay out your footprint (if you have one), stake out the corners, attach the poles, and clip everything together. From there, the rainfly is often the trickiest part (we’ve put ours on inside or backwards more times than we can count), and you have those small Velcro attachments on the inside. But the whole process usually takes just a few minutes from start to finish, which is fantastic.
It’s worth noting that some ultralight tent systems can be more finicky to set up and definitely require some practice. When getting acquainted with shelters like the Zpacks Duplex Pro, we've found ourselves fumbling at first to get everything taut and in place. And because Hilleberg tents are designed so uniquely, it can take a few tries to get the setup speed where you want it. Regardless of your tent choice, it’s always a good idea to set it up at home first. Not only will this help ensure you know what you’re doing in the backcountry when conditions may be more challenging, but it also ensures you have all the necessary components.

The term freestanding means that by attaching poles to the tent body, it has a solid structure and can stand completely on its own. Non-freestanding or semi-freestanding tents need to be staked out in some (or all) of the corners to create a rigid frame. The benefit of a freestanding tent is its simple setup, which makes it far easier to move from one area of your campsite to another (or to use on a rocky surface). As a result, most mainstream tents are freestanding. Non-freestanding tents require fewer pole sections, which reduces weight, and are a popular choice for backcountry enthusiasts who are well versed in choosing a good campsite and erecting a tent. Owing to their design, semi- and non-freestanding tents also tend to have more sloped walls (read: less headroom) and less overall interior space. For a deeper dive into the topic, see our article on freestanding vs. non-freestanding tents.
Without getting too into the nitty-gritty on tent poles and stakes, there are a few important details to cover. Nearly every quality backpacking tent uses aluminum poles (exceptions to the rule are the Zpacks Duplex Flex and Big Agnes Fly Creek Carbon, not featured above, which use carbon fiber poles). Aluminum is relatively affordable, lightweight, and will flex quite a bit prior to failing. Name-brand poles like Easton or DAC are easy to trust, although we always recommend bringing along a lightweight pole splint (like this one from Gear Aid) in case of failure mid-trip. In terms of structure, you’ll find simple pole layouts in budget tents while more premium tents tack on a ridge pole at the apex for stability and headroom. And currently, most of our favorite tents feature hubbed poles (meaning the poles are all attached to a central “hub”), which offer greater rigidity and easier setup.
.jpg)
No matter the tent style or manufacturer, stakes are an integral part of setting up a tent. Most two-person tents will include six: one for each corner and one for each side of the vestibule. That’s all fine and good for setting up in mild conditions, but it’s insufficient for bad weather when you want to use guylines. Thus, you may want to purchase some extra stakes, and it could be worth replacing your stock ones as well. Cheaper hook-style aluminum stakes come with most tents and can be a pain to use because they’re too thick and round to sink easily into the ground, and they tend to bend when hammered in. Thankfully, upgrading isn’t very expensive. We like the MSR Ground Hogs: They are light, tough, and easy to set up. And the DAC stakes that come with the Hilleberg Nallo (and other Hilleberg models) are some of the best we've used.
.jpeg)
Most of the backpacking tents we recommend are two-person models with floor plans that accommodate two 20-inch sleeping pads side by side. The two-person tent is the most popular capacity, but many backpacking models also come in one-, three-, and four-person designs. Solo travelers can save some weight by opting for a one-person option, while families or couples traveling with a dog can bump up to a three- or four-person model. It almost goes without saying that weight and packed size will increase as capacity increases, but it is worth noting that one four-person tent could be lighter than two two-person tents. For example, the Marmot Tungsten 4-person tent weighs 9 pounds 3.8 ounces, while the two-person version weighs 5 pounds 11 ounces.
.jpg)
Sustainability is an increasingly important consideration for many consumers, and we’re happy to see several leading outdoor brands rising to the occasion. The two most common sustainability measures we look for in backpacking tents are recycled fabrics and PFAS-free water-repellent coatings, the latter of which avoid harmful per- and polyfluoroalkyl substances—“forever chemicals” notorious for their inability to break down over time. Nemo is a clear leader in fabric innovation, with all of its offerings utilizing recycled materials and PFAS-free coatings. Big Agnes, MSR, and a couple of others have also started using solution-dyed fabrics in many of their tents, which require less energy and water during production than standard dyeing practices.
.jpg)
A footprint is optional—some tents include one, while others do not. These simple tarps go beneath your tent to provide an extra layer of protection. They’re an added bit of assurance to have when it’s wet or when you’re camped on rough surfaces like granite or sharp plants. That said, they do add an additional cost (a $40 footprint would increase the price of a $200 tent by 20%) and 5 to 10 ounces to your pack.
Here’s our take: A footprint is a good idea if your tent is thin in terms of denier (see the durability section) or if you plan on camping on rough surfaces like granite, tend to be careless with your gear, or don’t have the risk tolerance for a torn floor (and the subsequent repair). On the other hand, if you have a durable tent and are camping on dirt, it’s unlikely that your tent will rip.
.jpg)
If you do choose to buy a footprint, you can usually get one specifically designed for your tent, pre-cut to the proper dimensions, and with grommets that attach directly to the tent poles. If your tent has a fast-pitch option, the footprint will complete the setup, allowing you to set up an ultralight shelter by adding your tent poles and rainfly. And for those who want to save money or weight, there are a number of DIY options, including grabbing a sheet of Polycryo or Tyvek from your local hardware store (or the dumpster near a construction site—as our dirtbag editor is known to do). For more information and to help you decide whether a footprint is necessary for your kit, see our article: Does Your Backpacking Tent Need a Footprint?

Cost is always a key consideration, and a backpacking tent is a big purchase. If you are on a budget, plan to backpack only once or twice a summer, cover short to moderate distances, or just don’t mind carrying a few extra pounds, we are big fans of entry-level tents. The quality is good, they're durable and roomy, setup is easy with simplified pole structures, and they cost way less than lighter-weight models. For casual backpackers on shorter trips, there is no need to spend more.

Continuing up the price ladder, the trend is toward lighter and more packable designs. For those who take multi-day backpacking trips, get out a lot, and prioritize a low pack weight, the investment will be well worth it. Tents that are lightweight yet uncompromised will be among the most expensive, while semi-freestanding designs with smaller footprints will be less. Most people may not want to consider anything above $500, but this is where you’ll find the lightest designs and the most expensive materials, such as Dyneema fabrics and carbon fiber poles. These tents are a good fit only for weight-conscious backpackers and thru-hikers who spend nights outside and need the best tool for the job. However, unless you care a lot about saving weight, they’re often not the best value, with fragile materials and compromised livability and features.
Back to Our Top Backpacking Tent Picks Back to Our Backpacking Tent Comparison Table
.jpg?h=fbc67360&itok=uvqOCMGt)
- s.jpeg?h=d4c92dd0&itok=KMSwcfQl)
.jpg?h=fbc67360&itok=_31ZUgeg)
.jpg?h=fbc67360&itok=y7o1xQoi)
.jpg?h=fbc67360&itok=Uy_I1thi)
.jpg?h=fbc67360&itok=bVJPaD3z)
.jpg?h=fbc67360&itok=nggraBnh)
